
Key Takeaways
Table setting diagrams provide visual guides that simplify the placement of dining items for any occasion.
Understanding basic elements like plates, cutlery, and glassware helps you create functional layouts.
Following a step-by-step approach ensures your diagram is clear, accurate, and easy to follow.
Avoiding common placement mistakes keeps your table setting professional and guest-friendly.
What is a Table Setting Diagram?
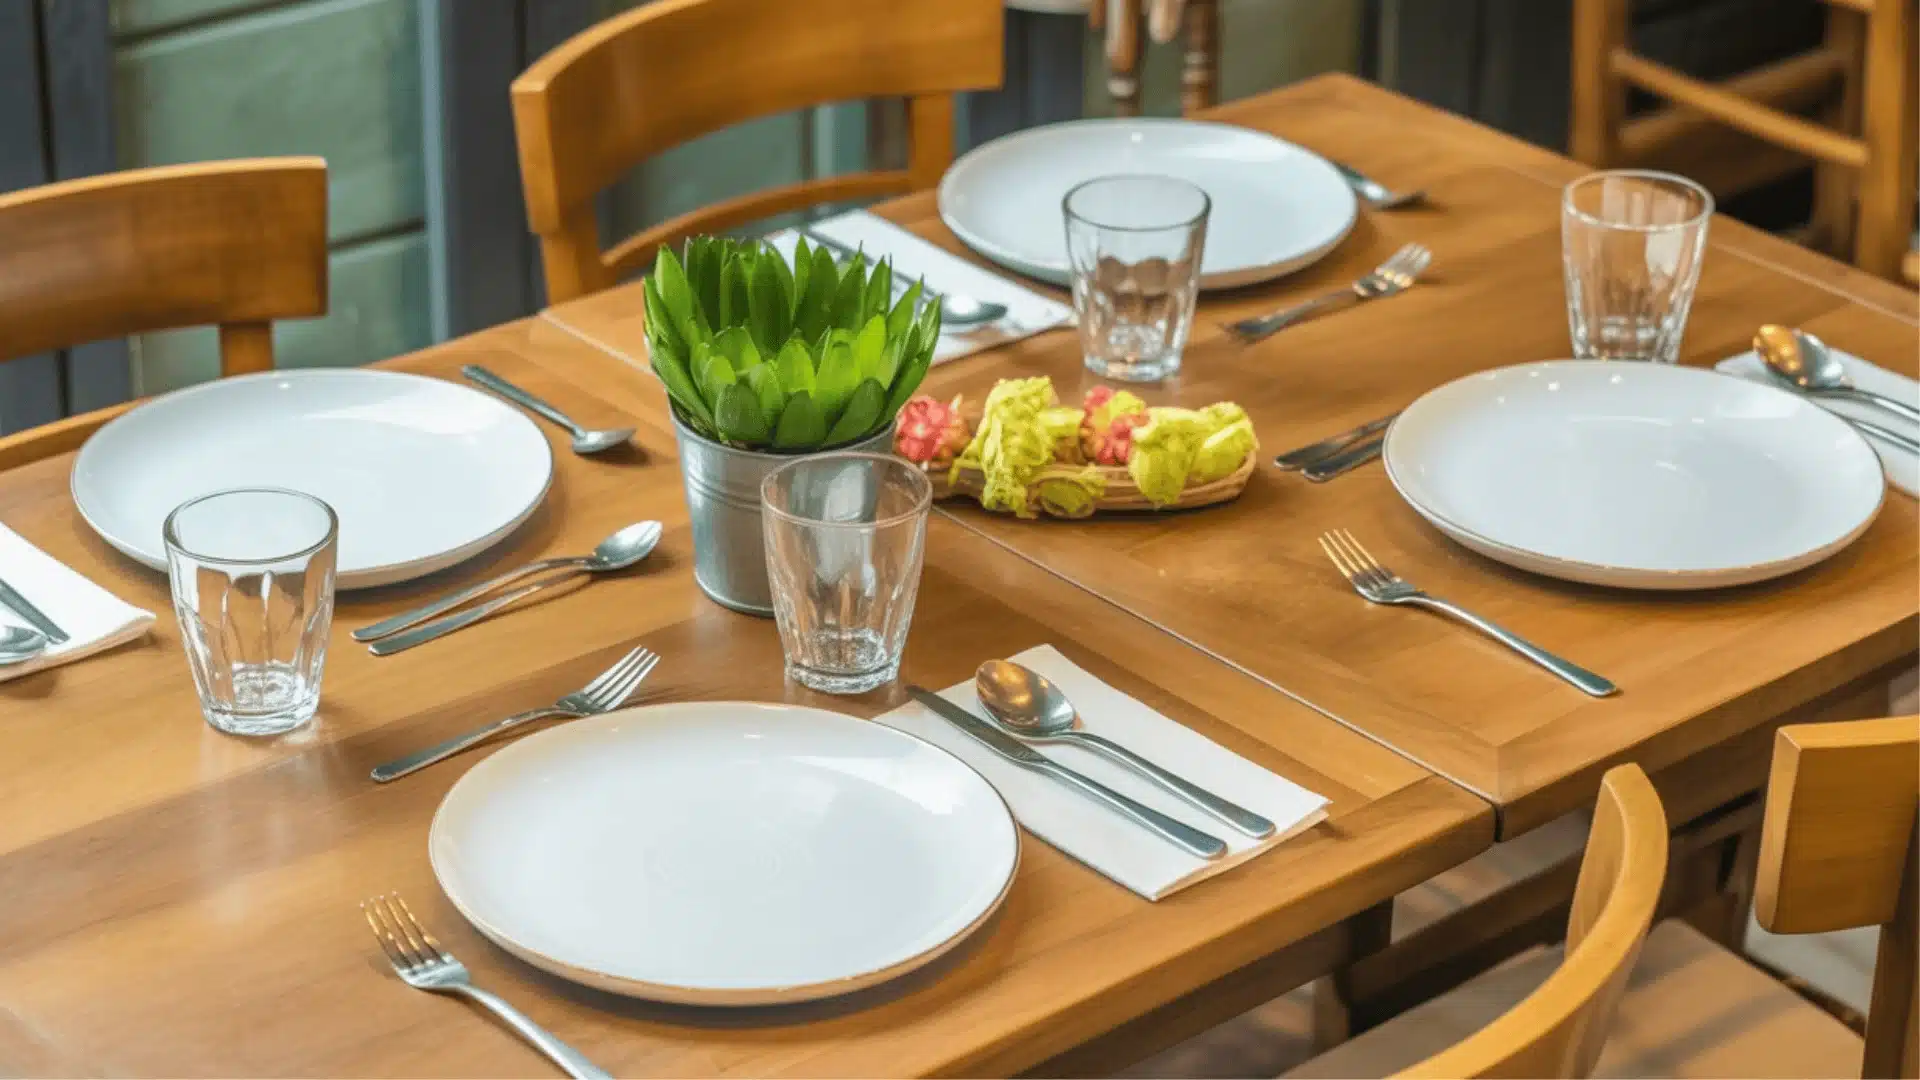
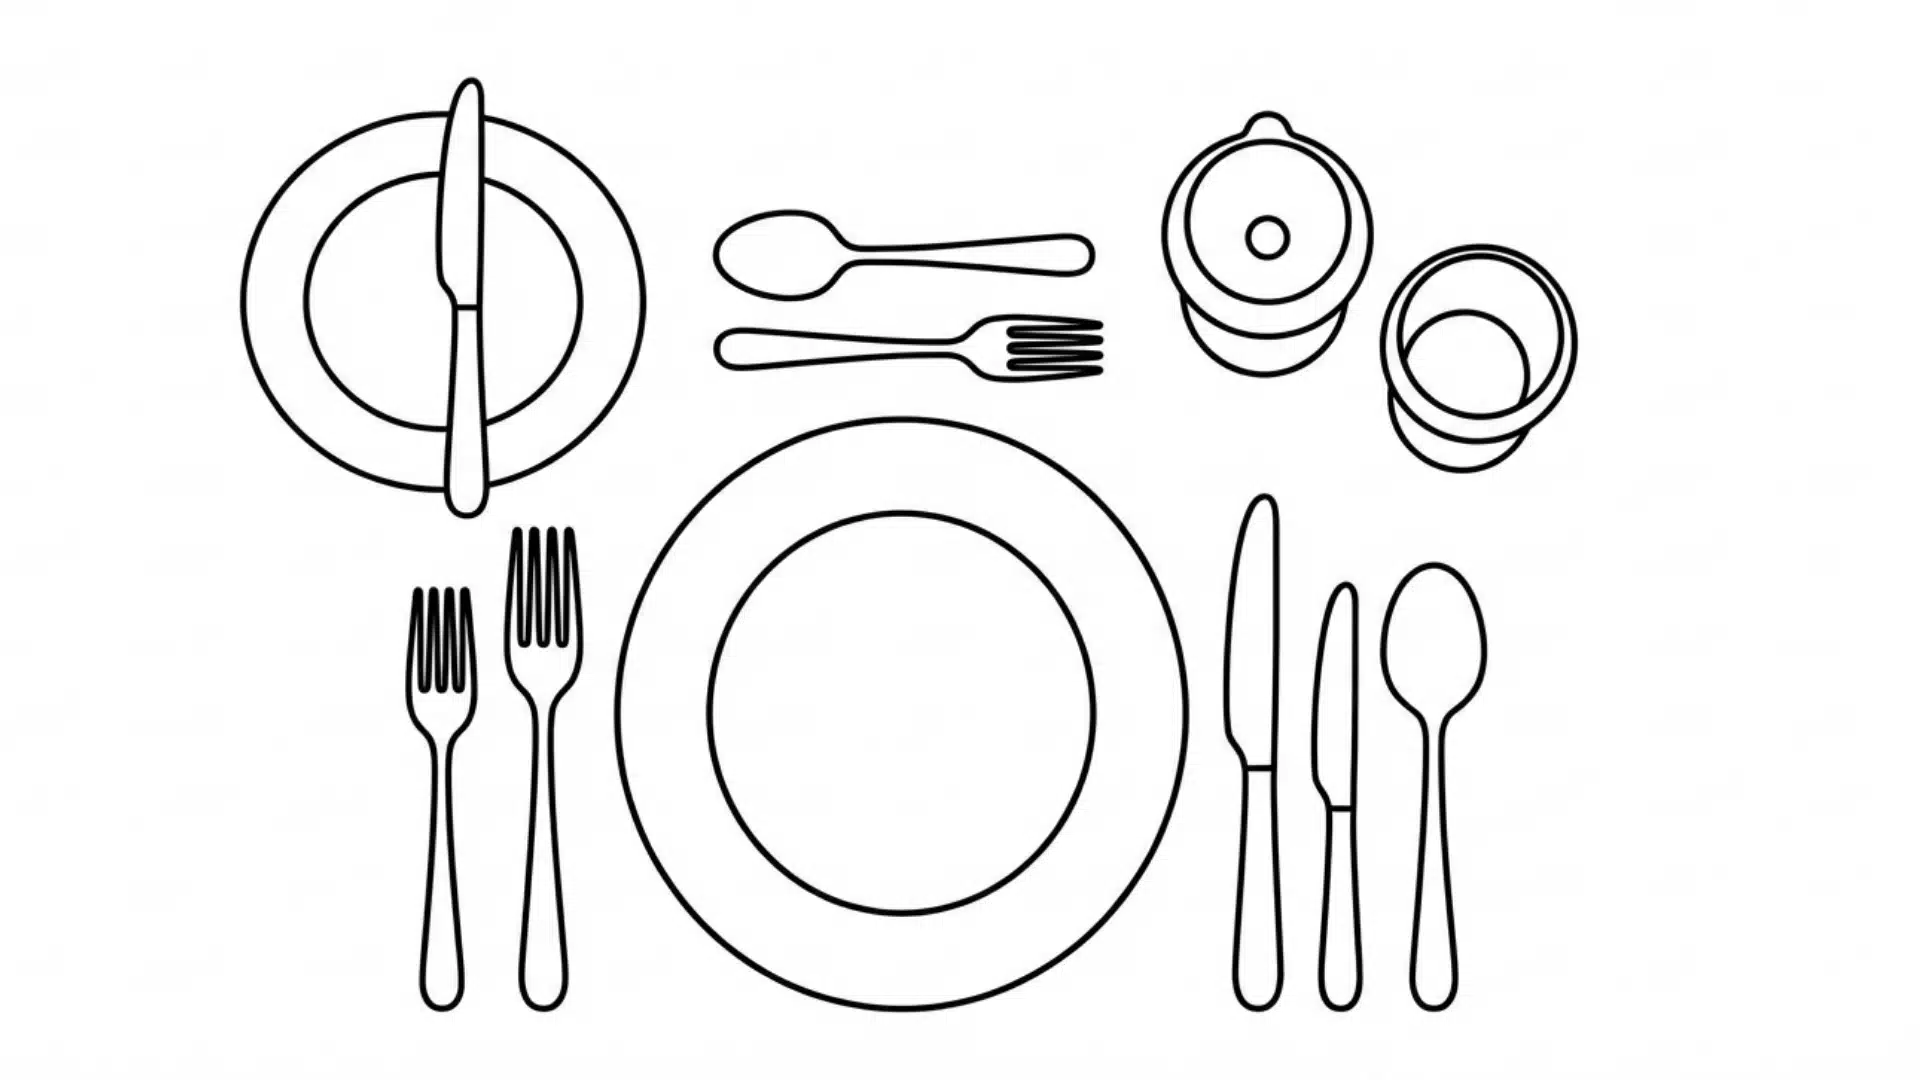
A table setting diagram is a visual guide that shows exactly where to place each piece of dinnerware, glassware, and cutlery for a meal.
Think of it as a map for your table; it takes the guesswork out of hosting, whether you’re setting up for a regular dinner at home or an event.
It ensures every fork, knife, spoon, and glass lands in the right spot, making your table look polished and intentional every single time.
How Diagrams Differ from Written Instructions?
Written instructions can confuse people. They require reading and mental visualization.
Diagrams show everything at once. You see the complete setup instantly.
Here’s why diagrams work better:
- Visual clarity
- Quick reference
- Less room for error
- Universal understanding
Why are Table Diagrams Important?
Table setting diagrams save time and reduce stress. They ensure consistency across all place settings.
Events: Wedding planners use diagrams to train staff. Everyone sets tables the same way to avoid any confusion.
Dining establishments: Restaurants rely on these diagrams. Consistency improves the guest experience.
Hosting at home: First-time hosts feel swamped. A diagram removes guesswork.
When I hosted Thanksgiving last year. I printed diagrams for each table, which saved me two hours of stress.
The table-setting diagram serves as a reference point. It eliminates the need to remember complex rules.
Understanding the Basics Before Creating a Diagram
Before drawing a table-setting diagram, you need to know what will go on the table. Each item has a purpose and position.
Core Elements Found in Every Table Setting
Every table setting includes certain basics. These elements appear when you’re hosting a casual lunch or a formal dinner.
1. Plates: The main plate or a charger plate sits in the center. It anchors everything else.
2. Cutlery: Forks go on the left. Knives and spoons sit on the right. The number depends on your menu.
3. Glassware: Glasses sit above the knives. Water glasses are standard. Wine glasses get added for fancier meals.
4. Napkins: These can go on the plate or beside the forks. Some people fold them into creative shapes.
The Importance of Guest Comfort and Flow
A good diagram prioritizes guest comfort.
- Guests eat from the center outward. They pick up the outermost utensils first. Everything should feel natural to reach. This flow guides your entire layout.
- Space between place settings matters too. Guests need elbow room. They shouldn’t bump into their neighbor while eating.
Standard Table Setting Diagrams Explained
Different occasions call for different setups. Let’s look at the three main types of table-setting diagrams.
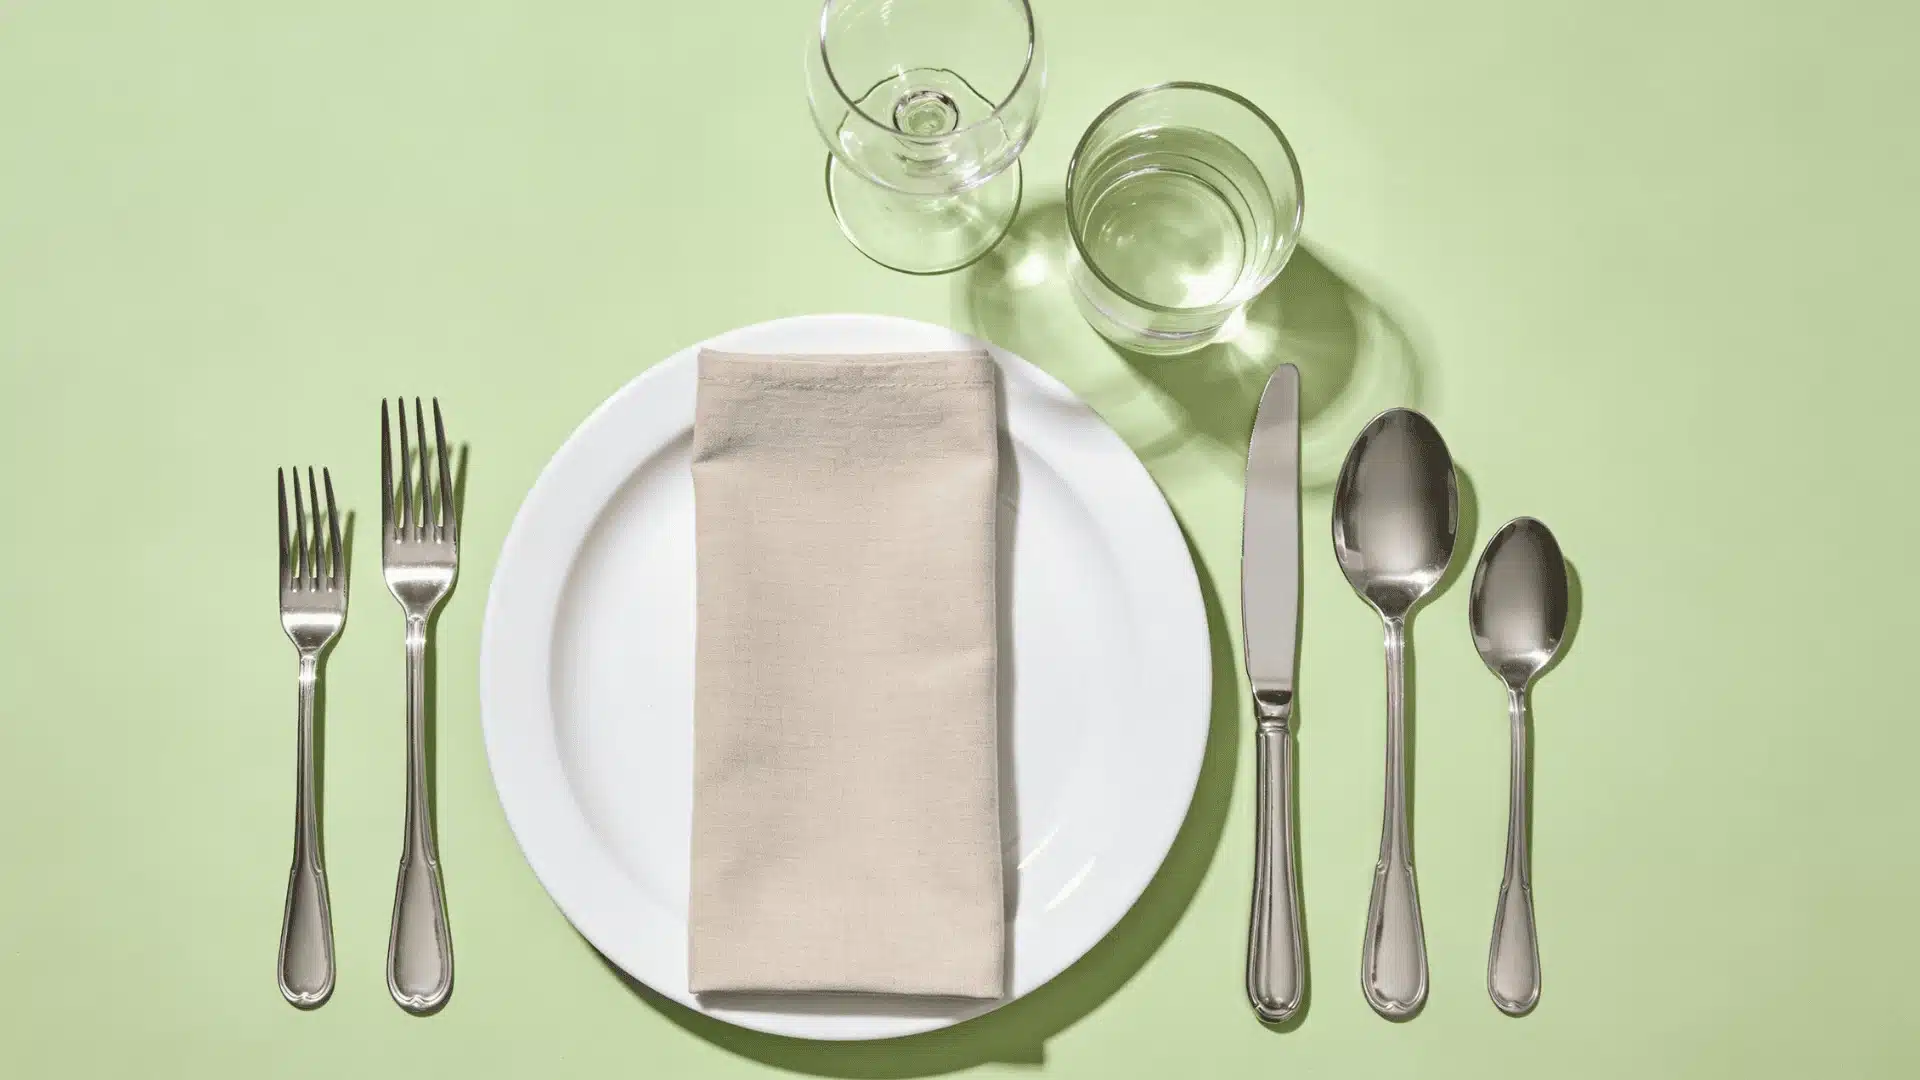
Basic / Everyday Table Setting Diagram
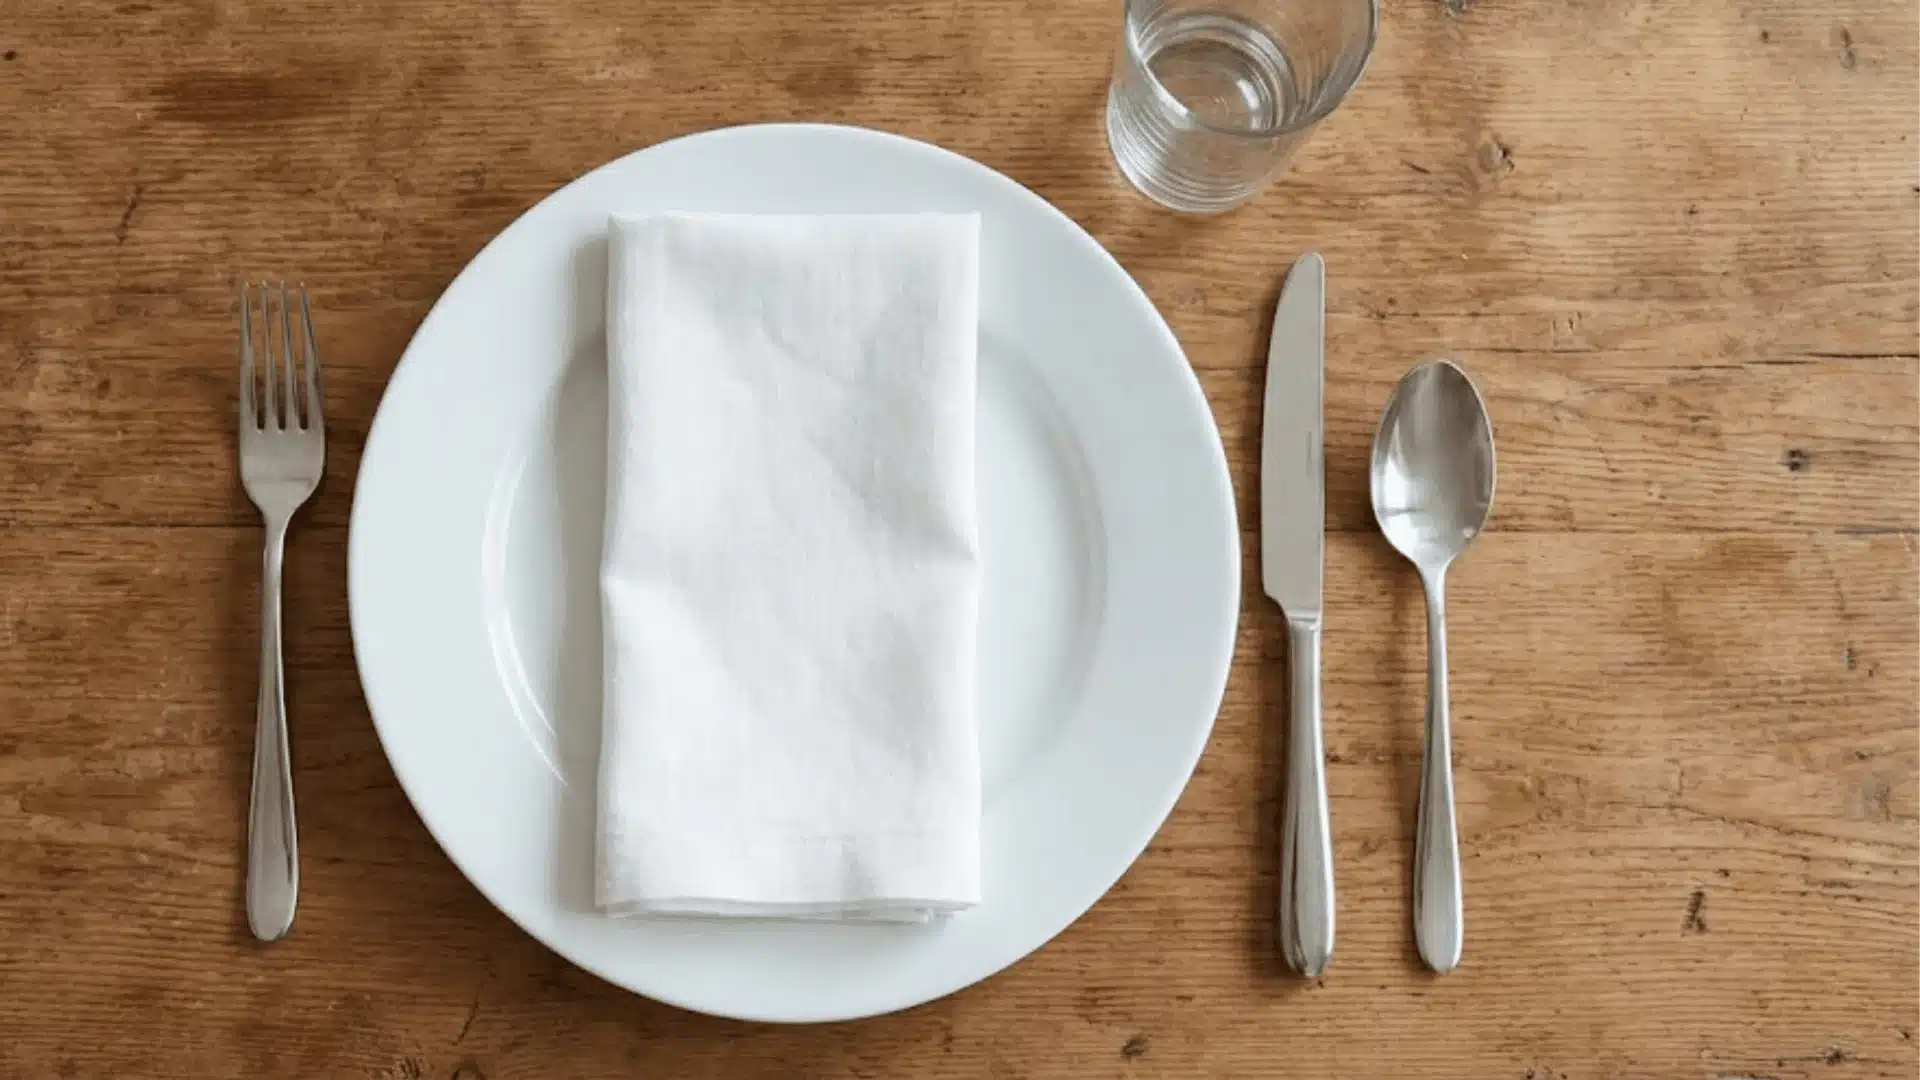
This setup works for daily meals. It keeps things simple and functional.
This setup needs:
- One dinner plate in the center
- One fork on the left
- One knife on the right (blade facing the plate)
- One spoon next to the knife
- One water glass above the knife
- One napkin (under the fork or on the plate)
This setting handles most home meals. Breakfast, lunch, and casual dinners all work with this layout.
I have seen people use this exact setup for decades. It never needed anything fancier.
Casual Table Setting Diagram
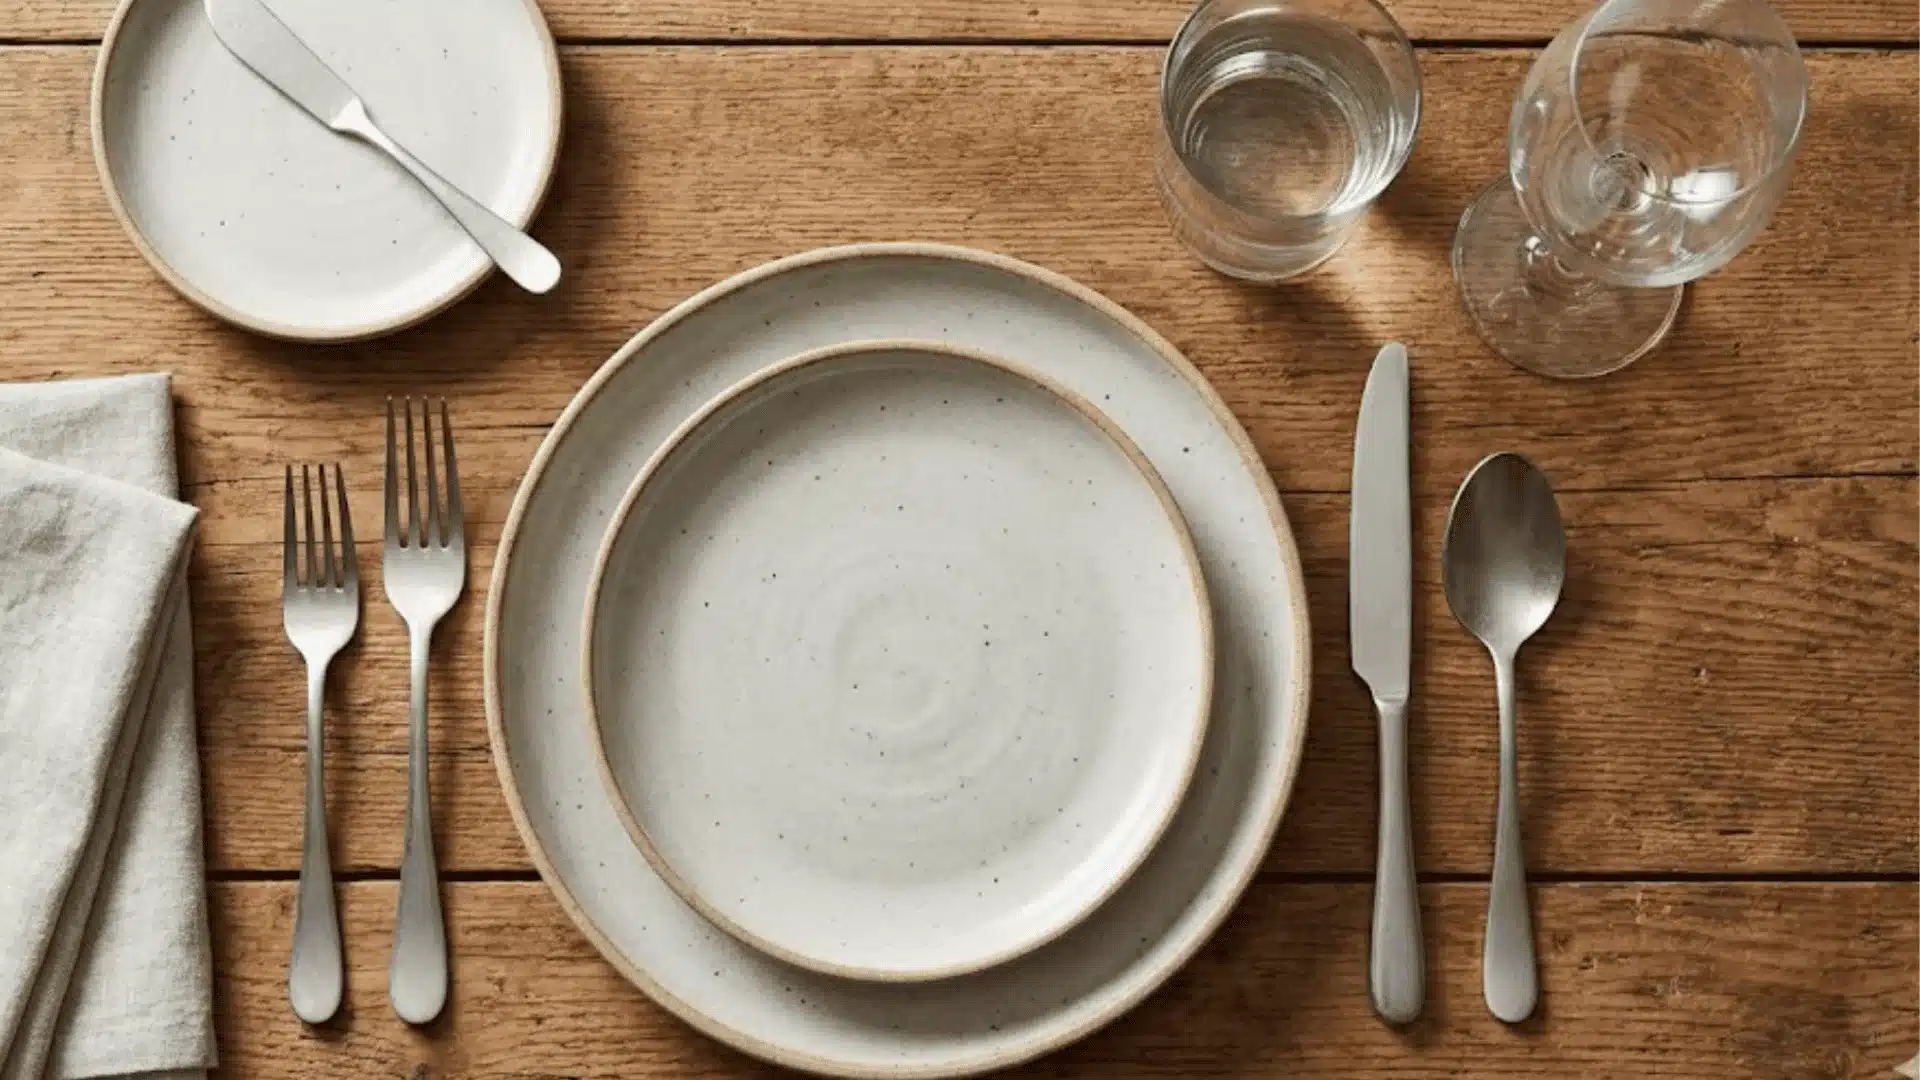
Casual settings add a few more items. They work for weekend gatherings or small dinner parties.
The setup includes:
- Dinner plate (sometimes with a salad plate on top)
- Salad fork and dinner fork on the left
- Dinner knife and soup spoon on the right
- Water glass and wine glass above the knife
- Napkin folded simply on the plate or beside the forks
- Optional bread plate on the upper left
This layout handles multi-course meals.
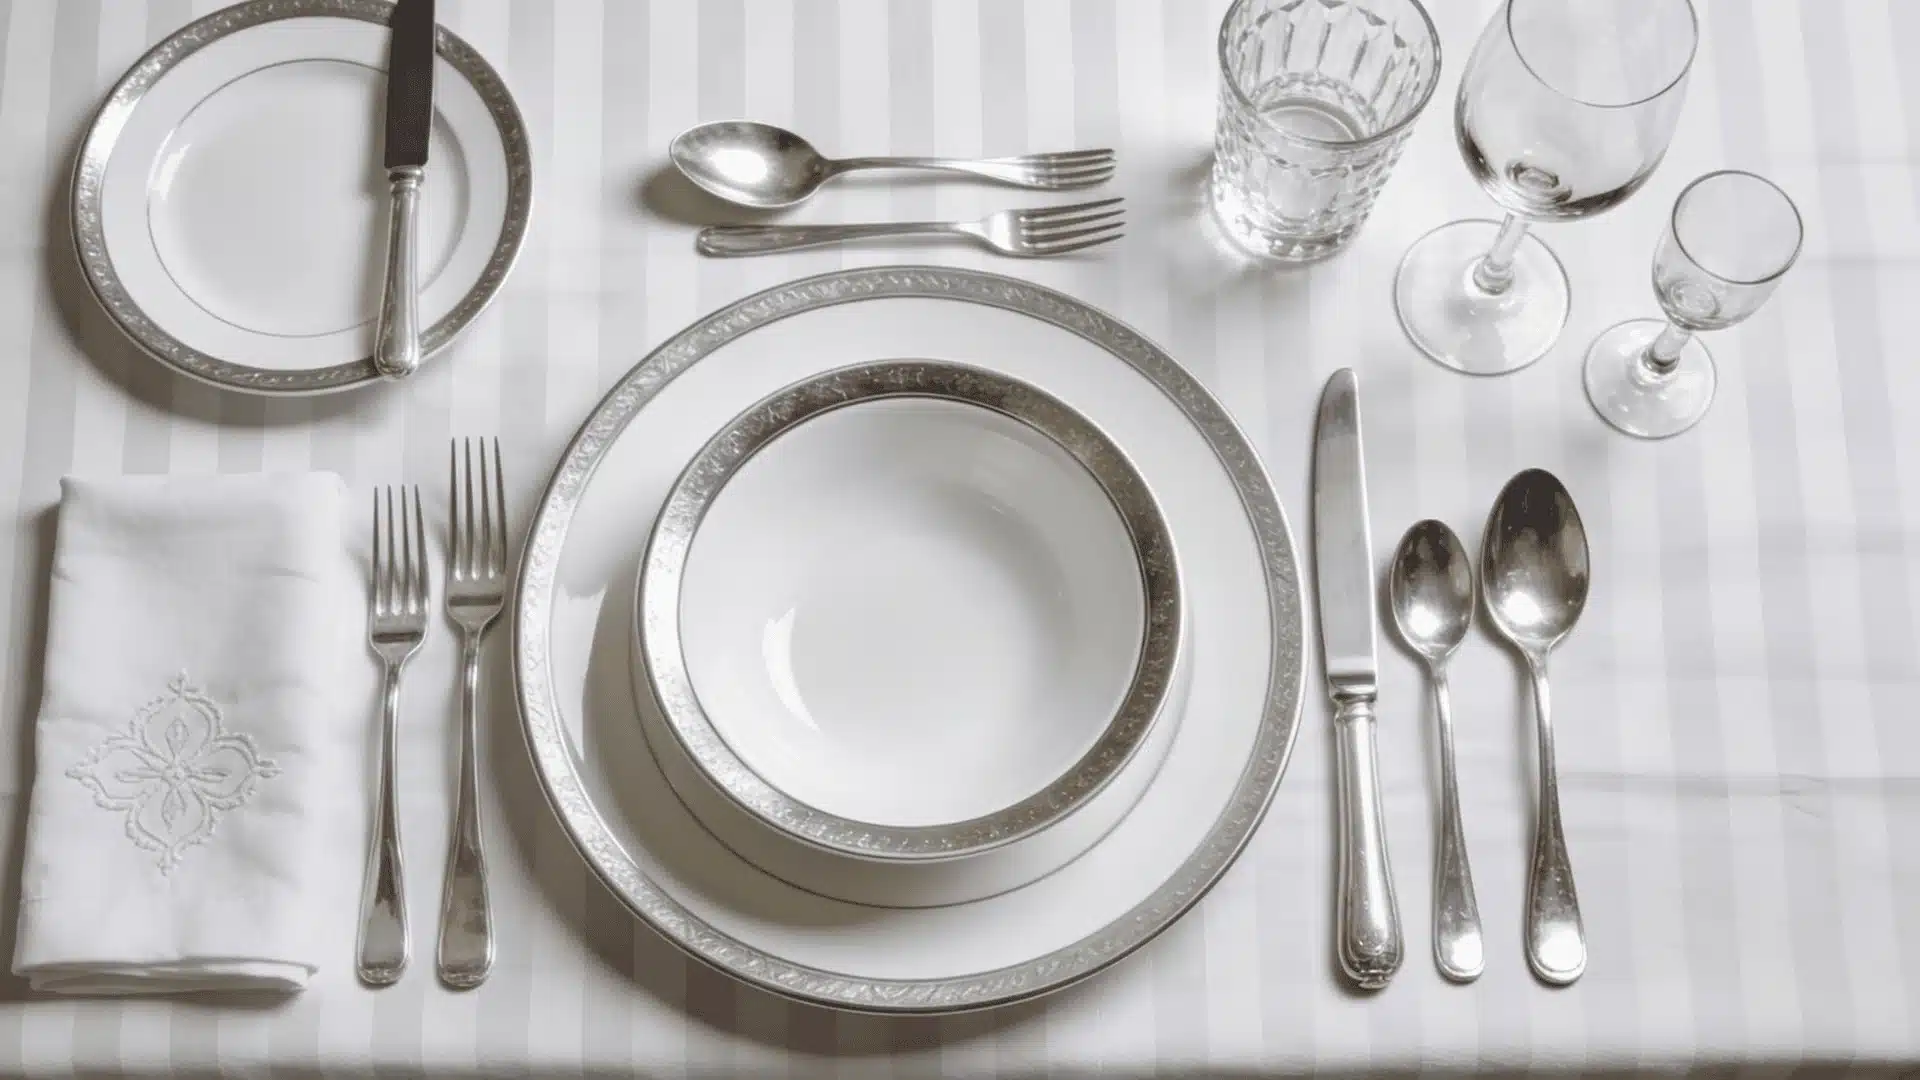
Formal Table Setting Diagram
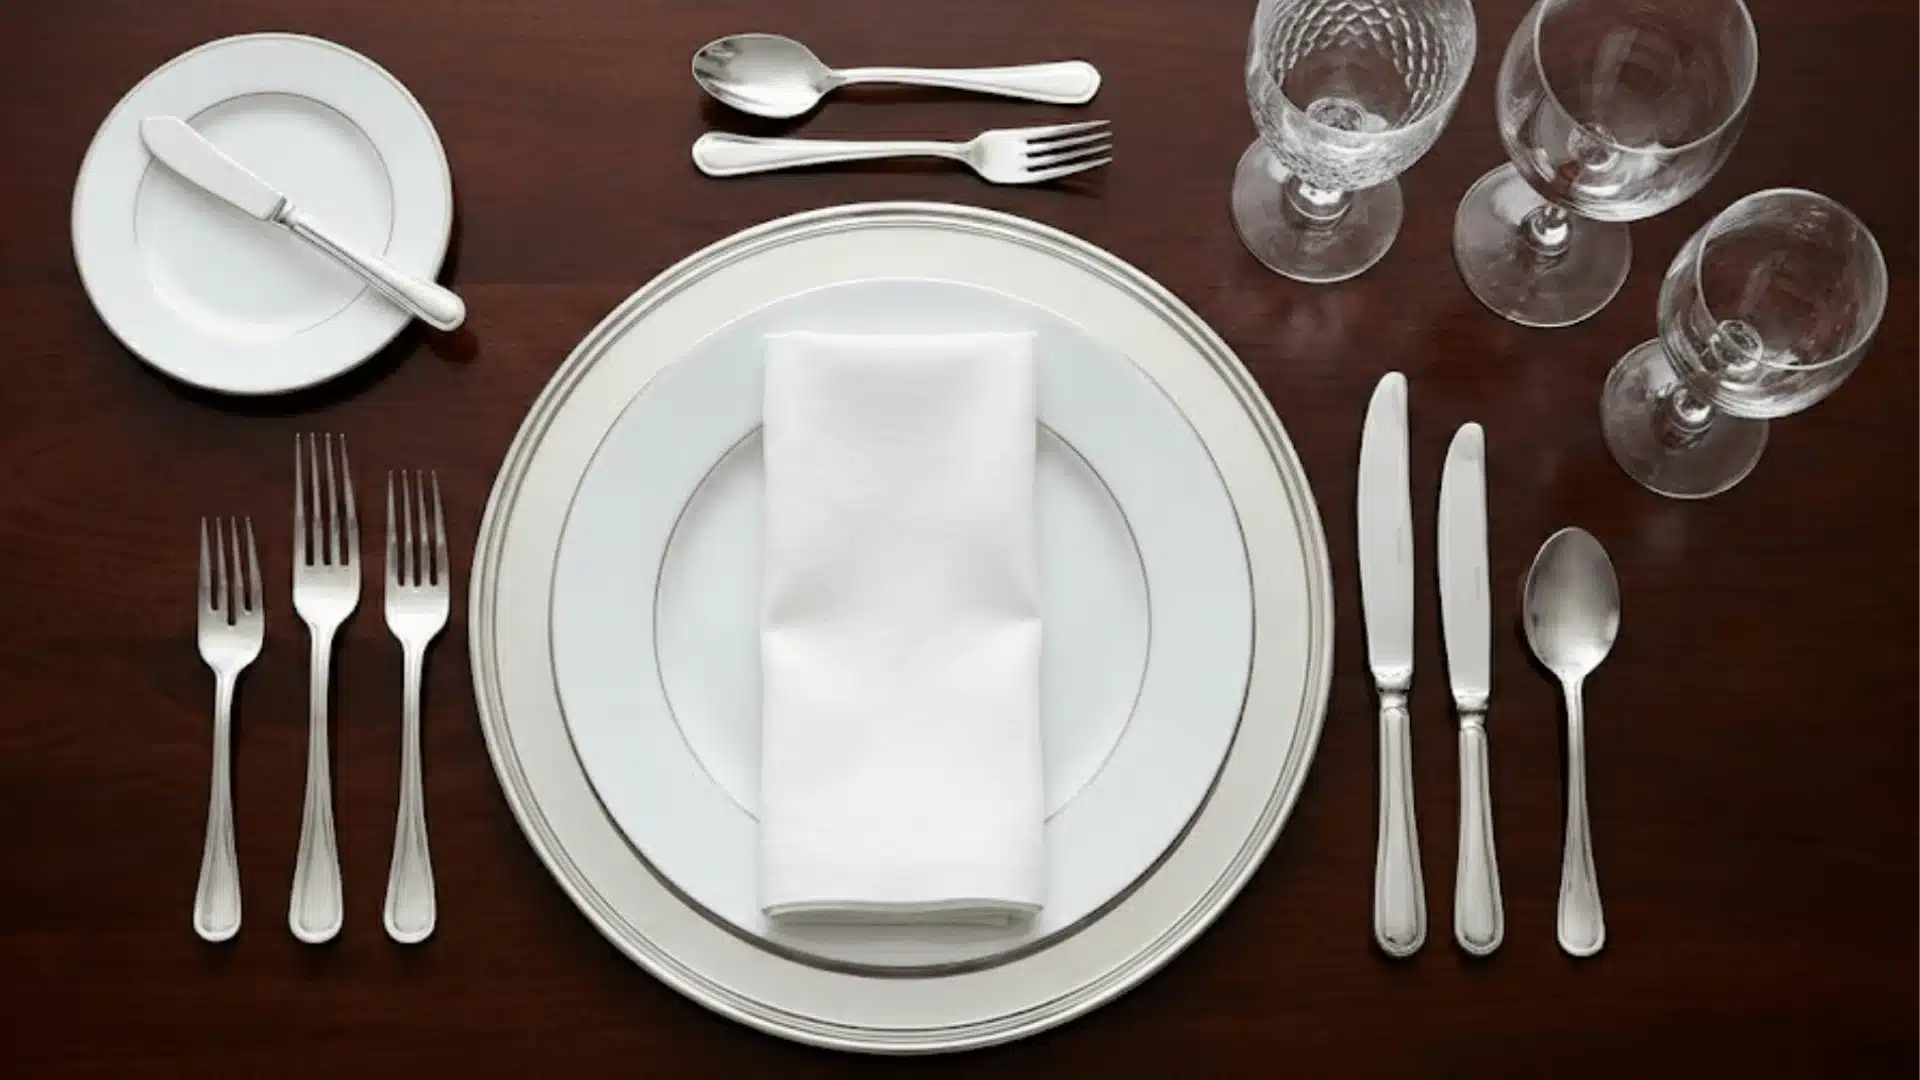
Formal settings may look complex, but they follow clear rules. They appear at weddings, galas, and upscale restaurants.
Complete formal setup:
- Charger plate (large decorative base plate)
- Dinner plate on the charger
- Multiple forks on the left (salad, dinner, fish)
- Multiple knives and spoons on the right
- Three or more glasses (water, red wine, white wine)
- Bread plate with butter knife on the upper left
- Dessert spoon and fork above the plate
- Formally folded napkin on the charger
Each utensil serves a specific course. This setting requires practice.
Informal Table Setting Diagram
An informal setting sits between casual and formal.
It works well for family dinners, relaxed celebrations, or occasions that feel slightly more special than everyday meals.
This arrangement incorporates:
- Dinner plate in the center
- Dinner fork and salad fork on the left
- Dinner knife on the right (blade facing inward)
- Water glass or beverage glass above the plate
- Napkin folded neatly beside the forks or on the plate
This setting strikes a good balance. It feels put together without requiring the precision of a full formal layout.
Five Course Meal
A five-course meal setting may look elaborate, but it follows a straightforward logic.
Each utensil placed corresponds directly to a course being served.
The setup contains:
- Charger or dinner plate in the center
- Two to three forks on the left (fish, salad, dinner- working from outside in)
- Soup spoon, dinner spoon, and dinner knife on the right
- Dessert spoon and fork placed horizontally above the plate
- Bread plate with butter knife on the upper left
- Three glasses on the upper right (water, white wine, red wine)
- Formally folded napkin beside the charger plate
The rule to remember is simple.
I start from the outside and work inward with each course. Once that clicks for you, the rest of the layout makes complete sense.
Step-by-Step Guide to Creating a Table Setting Diagram
Creating your own diagram becomes easy with a clear process. Follow these steps in order.
Step 1: Decide the Type of Meal and Occasion
Your first decision shapes everything else. Ask yourself what kind of event this is. A birthday brunch needs different items than a holiday dinner.
Consider these factors:
- Time of day: Breakfast needs fewer utensils than dinner.
- Guest expectations: Close friends are comfortable in casual settings. Business dinners require more formality.
- Menu complexity: Multiple courses need more utensils and plates.
- Cultural considerations: Some cuisines require specific serving styles.
Make a list of what you’re serving. Each dish might need its own utensil.
Step 2: Choose the Correct Table Shape and Size
Your table shape affects how you arrange everything. Different shapes require different approaches.
Round tables create intimate settings where everyone faces each other.
Rectangular tables work better for larger groups. They create clear head positions. The host typically sits at the either end in such a table setting.
Each shape has spacing considerations:
- Round tables need curved arrangement patterns
- Rectangular tables follow straight line layouts
Step 3: Place the Plate as Your Anchor Point
Everything on the table is positioned relative to the plate, so I start there.
Place it directly in front of the chair, centered between the armrests, and about one inch from the table edge.
This protects it from being knocked off and gives guests comfortable arm space.
For formal settings, the charger plate goes down first with the dinner plate placed on top.
On a table setting diagram, draw the plate as a circle at the center of each setting. Everything else builds around it.
Step 4: Add Cutlery Using the “Outside-In” Rule
Forks, knives, and spoons follow a simple pattern. This rule makes the setup foolproof.
I understood this rule while setting up for a dinner party. I simply learned that guests work from the outside in as each course arrives.
For a three-course meal with salad, main dish, and soup:
- Salad fork (outside left)
- Dinner fork (inside left, closest to plate)
- Dinner knife (inside right, next to plate)
- Soup spoon (outside right)
Step 5: Position Glassware Without Overcrowding
The water glass sits about 1 inch above the knife tip, which is close enough to reach without knocking over the utensils.
Add wine glasses only if you’re serving wine. Red and white wine glasses can both be used.
Place the red wine glass to the right of the water glass. The white wine glass goes to the right of the red wine glass.
Keep glasses in a neat formation. Three glasses at most in most casual settings. Formal dinners might include four or five glasses.
But only if the menu requires them.
Step 6: Final Touches That Complete the Diagram
These last details bring the whole setting together.
The napkin can be placed in three spots: folded on the center of the plate, to the left of the forks, or tucked underneath them.
For formal settings, a fancy fold on the charger works well.
The bread plate goes above and to the left of the dinner plate. Placing it on the right causes confusion.
Optional finishing elements include:
- Place cards above the plate
- Menu cards for formal events
- Salt and pepper shakers between settings
Keep the table setting diagram clean, labeled clearly, and drawn to scale.
What Not to Do When Making a Table Setting Diagram
Even experienced hosts make errors. I’ve made most of these myself over the years.
Here are the most common ones.
- Knife blade facing outward
- Overcrowding the place setting
- Placing forks on the right side
- Using the wrong glass positions
- Making the diagram too complex
Tips to Customize Your Table Setting Diagram
Make your diagram work for your specific needs. Here’s how.
Adjust for special dietary needs
If guests have dietary restrictions, mark their places. Use different colored place cards or symbols.
Your diagram can include notes like gluten-free setting or a child’s portion.
Create themed variations
Holiday dinners might need special touches. Add Christmas colors to winter diagrams. Use pastels for spring brunches. Theme your table setting to match the event.
This makes planning more fun.
Design for different skill levels
Create beginner-friendly versions with extra labels. Make advanced versions that assume knowledge.
If you are teaching kids, use pictures instead of words.
Ready to Set Your Next Table?
Creating a table-setting diagram requires clarity and purpose. You’ve learned the basics, explored different styles, and discovered common mistakes to avoid.
I created my first diagram for Easter brunch many years back. The diagram gave me the confidence to host.
Now it’s your turn to practice. Try it at your next family meal. Notice how a simple diagram removes guesswork and speeds up preparation.
Got questions about your specific table setting needs? Drop a comment below for suggestions.
Frequently Answered Questions (FAQ’s)
1. Why do You Not Put Your Elbows on The Dinner Table?
Elbows on the table take up space, crowd out neighbors, and traditionally signal poor posture and a lack of manners.
2. Should You Leave Placemats on The Table?
You can leave placemats on the table as decorative elements, but remove them before formal meals or deep cleaning.
3. Where Does The Fruit Bowl Go in a Table Setting?
The fruit bowl sits at the center of the table setting. Ensure its not too far from the sight.
4. Where do The Coffee Cup and Saucer go in a Table Setting?
The coffee cup and saucer sit to the right of the spoon and knife.